It’s been a busy couple of weekends here on the block. With Deirdre’s parents coming next week to help put up the frame we’ve been busying ourselves with shovels and concrete to get the footings and floor for the yoga studio complete.
The Design
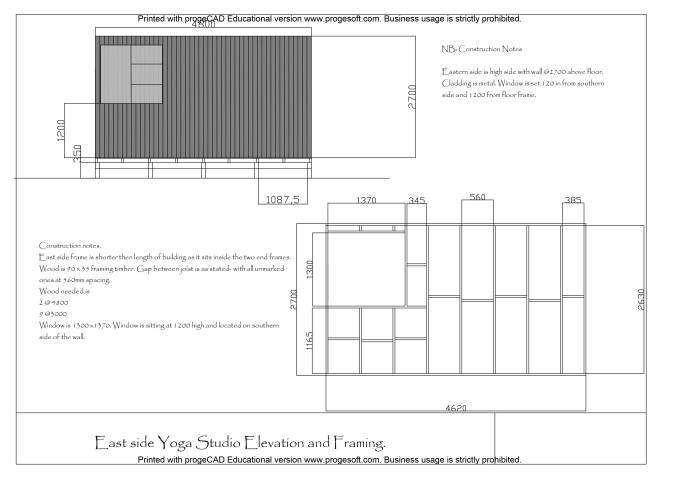
The design process for the yoga studio was quicker than that of the bus. After toying with a few different sizes for the studio we settled on a 2.4m by 4.8m studio. Those dimensions being settled on by the simple fact that the wood for the bearers and joists came in that size. We figured it would be easy to not have to cut the wood down to size too much.
Continuing on with the ease of construction we chose a single sloping roof. Going from a height of 2.7m on the east to 2.4m on the west. The whole studio would be cladded in a combination of corrugated tin and wood. On the east and west there would be a window. On the north a double french style type doors. The dimensions and descriptions of which are on the photos below.


Footings
Having learnt our lesson from the decking we erred on the side of more posts and bearers then required. This way we could be certain that the studio would be as strong as possible. In the end this meant a design of 3 rows of 5 posts spaced at roughly 1200 intervals. Attached to each of these posts would be two bearers- on on either side. The joists would then be set atop of these. All of these can be seen better in the picture below, including the description of the wood we used.

Setting the posts
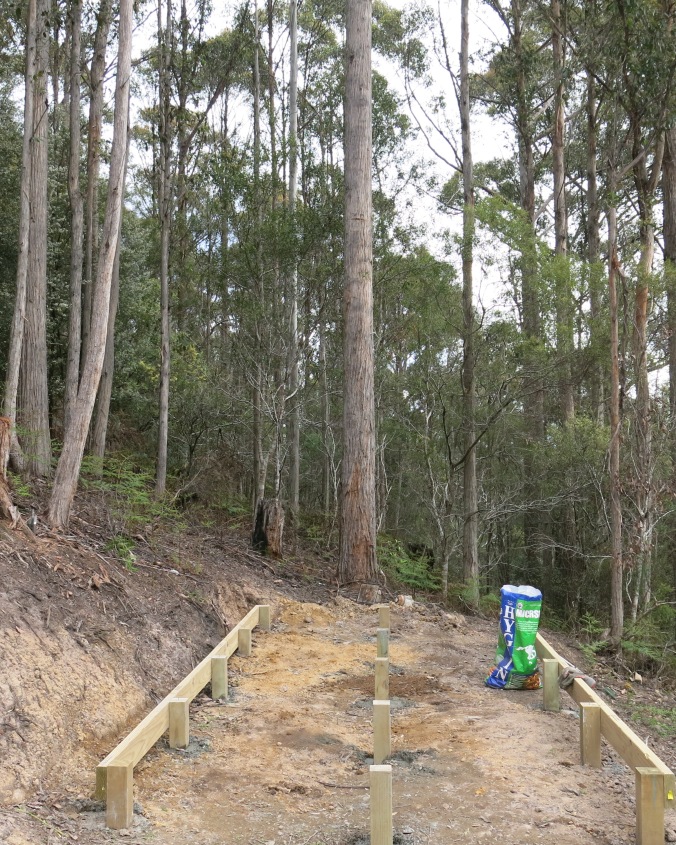
Over the courses of the two weekends we set about digging holes for the posts. Conscious of the structure needing to be square this took longer then we thought to complete. We marked out the first and last post on one row and then set those with prepared concrete mix. With the two posts in and set at either end we then marked out the three other holes and dug those out to roughly 550m.

End posts in, getting ready to measure and cut the next posts.
Next we then had to measure out the height of the posts. With the earth at various heights and the holes at various depths we had measure each post to the string line and then cut the posts to fit.

Cutting the posts.
With the posts cut we would then set the three middle posts one by one. To ensure that we had the posts aligned we used both a string line and one of the bearers. The bearer being a point of reference to ensure that the posts aligned correctly.

We then repeated this one the other side and then worked out the middle row, using the two outer rows to ensure that these posts were all in the centre of the structure.
All posts set and first of the bearers on.
Setting the bearers and joists.
The posts set and in place next we attached the bearers. A fairly easy task, although we did discover that with some of the warp in the wood we were 10mm narrower in the middle of the structure then on the edge.
With the bearers on Deirdre then set the joists. We had made the decision to use form plywood for the flooring. These were 1200 wide which meant that we needed to have joists there to attach the floor to. Deirdre marked these out and then placed the joists one by one, ensuring not only that they were at the right length but that insulation would fit without any need to cut it.
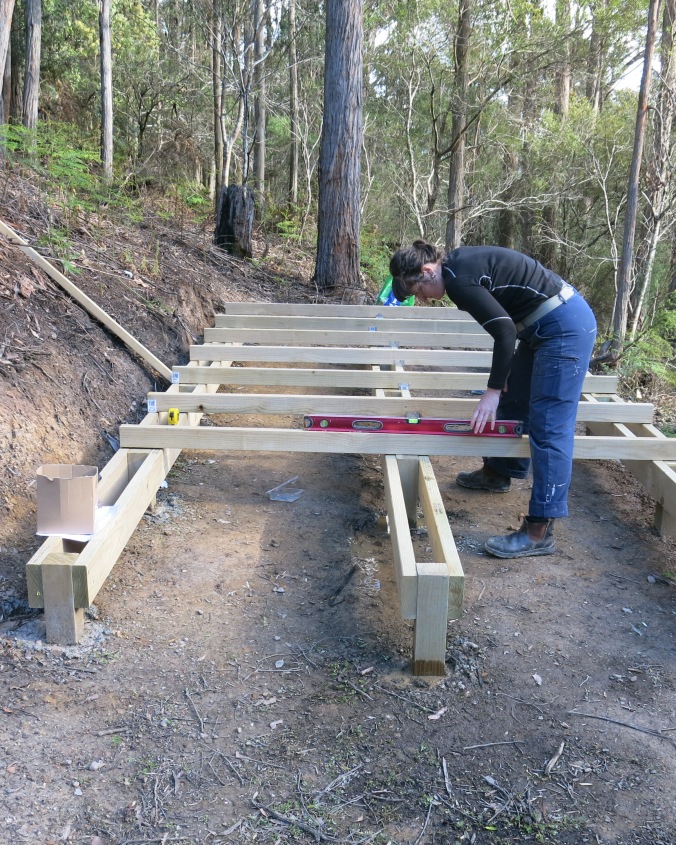
Deirdre checking for level on the joists.
Insulation and Floor
The joists completed and attached we spent one morning this week adding the insulation and then the floor. Again a task that was completed fairly quickly and we now have a floor ready for the frame to put up this week.

Halfway through the insulation.

Yoga studio flooring on ready for the frame!

“Brilliant!” Every time I want a bit of inspiration I come here. You guys are unstoppable. Can’t wait to see the finished results 🙂
LikeLike
Thanks. Should have another post up in the next few days on the next stage of the studio.
LikeLiked by 1 person
looks great and you planned very thoroughly. Just wondering about how there is no layer under the insulation.. it standard to do it that way?
LikeLike
Hi myf, Sorry for the delayed response have been away from the blog enjoying the lengthening days. There is no layer under the insulation as we were saving costs and felt that the strapping should support them enough. We have noticed recently a couple of paddy melons grazing under the studio so hopefully they are not going to eat the insulation.
LikeLike
paddy melons?? I will have to google it 🙂 After making it though an absolutely freezing Winter, I will always do whatever I can to keep heat in and cold out in future renos.
LikeLike
Nice work guys… Everything looks very straight 🙂
LikeLike
Pingback: Yoga studio part 2: frame up | twodogsandabus